이제 2번째 스텝
1. 프로젝트 생성 및 도커 이미지 빌드
2. github action을 통한 도커 이미지 빌드 자동화 / docker hub에 push
3. aws ec2에 도커 환경 구성하기 / docker hub에서 제대로 받아오는지 테스트
4. github action을 통한 서버 배포까지 자동화
원격 레포지토리 연동
먼저 github에 원격 레포지토리를 하나 생성 후 연동시켜 준다.
Github Action Configuration
프로젝트 루트에 .gihub/workflows의 폴더 경로를 추가한 후 yml 파일을 생성한다.
레포지토리 Actions 탭에서 Continuous Integration 항목을 살펴보면,
NodeJs 프로젝트를 위해 기본적으로 제공하고 있는 CI 설정 템플릿을 찾을 수 있다.
# This workflow will do a clean installation of node dependencies, cache/restore them, build the source code and run tests across different versions of node
# For more information see: https://help.github.com/actions/language-and-framework-guides/using-nodejs-with-github-actions

name: Node.js CI

on:
  push:
    branches: [ master ]
  pull_request:
    branches: [ master ]

jobs:
  build:

    runs-on: ubuntu-latest

    strategy:
      matrix:
        node-version: [12.x, 14.x, 16.x]
        # See supported Node.js release schedule at https://nodejs.org/en/about/releases/

    steps:
    - uses: actions/checkout@v3
    - name: Use Node.js ${{ matrix.node-version }}
      uses: actions/setup-node@v3
      with:
        node-version: ${{ matrix.node-version }}
        cache: 'npm'
    - run: npm ci
    - run: npm run build --if-present
    - run: npm test
하지만 이번 예제에서는 docker를 활용하고 Dockerfile 내에서 npm intall을 진행하고 있기 때문에 아래와 같이 변경해준다.
name: Node.js CI

on:
  push:
    branches: [ master ]
  pull_request:
    branches: [ master ]

jobs:
  build:
    runs-on: ubuntu-20.04

    strategy:
      matrix:
        node-version: [14.x]

    steps:
    - uses: actions/checkout@v2
    - name: Use Node.js ${{ matrix.node-version }}
      uses: actions/setup-node@v2
      with:
        node-version: ${{ matrix.node-version }}
    - name: Docker build
      run: |
        docker build -t node-example .
github marketplace에 도커에서 제공하고 있는 github action도 찾을 수 있지만, 이번 예제에서는 사용하지 않을 계획이다.
여기까지 했다면 원격 master 브랜치에 업데이트되면 github action이 실행되어 docker build까지 자동으로 진행한다. CI까지 마무리된 셈이다. 하지만 build한 이미지로 배포를 하기 위해서는 서버에서 이미지에 접근할 수 있어야 한다. 배포를 위해 docker hub에 이미지를 푸시하고 서버에서 해당 이미지를 받아올 수 있도록 작성할 예정이다.
Docker Hub Push
Docker hub에 접속하여 레포지토리를 생성해준다. 설정을 해주기 전에 로컬에서 이미지를 제대로 보내주는 지 확인해 보자. docker hub의 유저 네임과 레포지토리 이름으로 태그를 붙여주고 해당 태그로 푸시를 한다. tagname을 생략하면 latest로 자동 설정된다.
> docker tag node-example ${username}/${repository}:tagname
> docker push ${username}/${repository}:tagname
Docker Hub Push(자동화)
도커 허브에 접속하면 푸쉬된 이미지를 확인할 수 있다. 이 작업을 자동화해보자.
name: Node.js CI

on:
  push:
    branches: [ master ]
  pull_request:
    branches: [ master ]

jobs:
  build:
    runs-on: ubuntu-20.04

    strategy:
      matrix:
        node-version: [14.x]

    steps:
    - uses: actions/checkout@v2
    - name: Use Node.js ${{ matrix.node-version }}
      uses: actions/setup-node@v2
      with:
        node-version: ${{ matrix.node-version }}
    - name: Docker build
	  run: |
		docker login -u ${{ secrets.USERNAME }} -p ${{ secrets.PASSWORD }}
		docker build -t node-example .
  		docker tag node-example rheech22/node-example:${GITHUB_SHA::7}
	  	docker push rheech22/node-example:${GITHUB_SHA::7}
github action이 실행되는 환경에서 도커 로그인이 필요하기 때문에, 레포지토리 환경 변수에 username과 password를 추가해주고 위와 같이 작성해주면 된다. 환경 변수는 Settings > Security > Actions에서 추가할 수 있다.
GITHUB_SHA은 커밋 SHA를 의미하는데 ::7를 뒤에 붙여서 일곱 자리까지만 tagname으로 붙도록 해준다. 이는 중복된 이름으로 이미지가 푸시되지 않도록 하기 위함이다. GITHUB_SHA처럼 깃허브에서 제공하는 기본 환경 변수는 아래 링크에서 확인할 수 있다.
https://docs.github.com/en/actions/learn-github-actions/environment-variables
이미지 생성 및 배포 환경에 따라서 빌드 커맨드에 플랫폼 옵션을 추가해줘야 할 수도 있다. M1 Mac의 경우 이미지를 빌드하면 기본적으로 linux/arm64 버전으로 생성된다. 만약 배포 환경에 AWS EC2라면 linux/amd64로 플랫폼을 변경해줘야 한다.
위 설정 파일에서 빌드 명령어만 아래와 같이 수정했다.
docker build --platform linux/amd64 -t node-example .
name: Node.js CI

on:
  push:
    branches: [ master ]
  pull_request:
    branches: [ master ]

jobs:
  build:
    runs-on: ubuntu-20.04

    strategy:
      matrix:
        node-version: [14.x]

    steps:
    - uses: actions/checkout@v2
    - name: Use Node.js ${{ matrix.node-version }}
      uses: actions/setup-node@v2
      with:
        node-version: ${{ matrix.node-version }}
    - name: Docker build
	  run: |
		docker login -u ${{ secrets.USERNAME }} -p ${{ secrets.PASSWORD }}
		docker build --platform linux/amd64 -t node-example .
  		docker tag node-example rheech22/node-example:${GITHUB_SHA::7}
	  	docker push rheech22/node-example:${GITHUB_SHA::7}
원격 브랜치에 푸시해보고 실제로 잘 되는지 확인
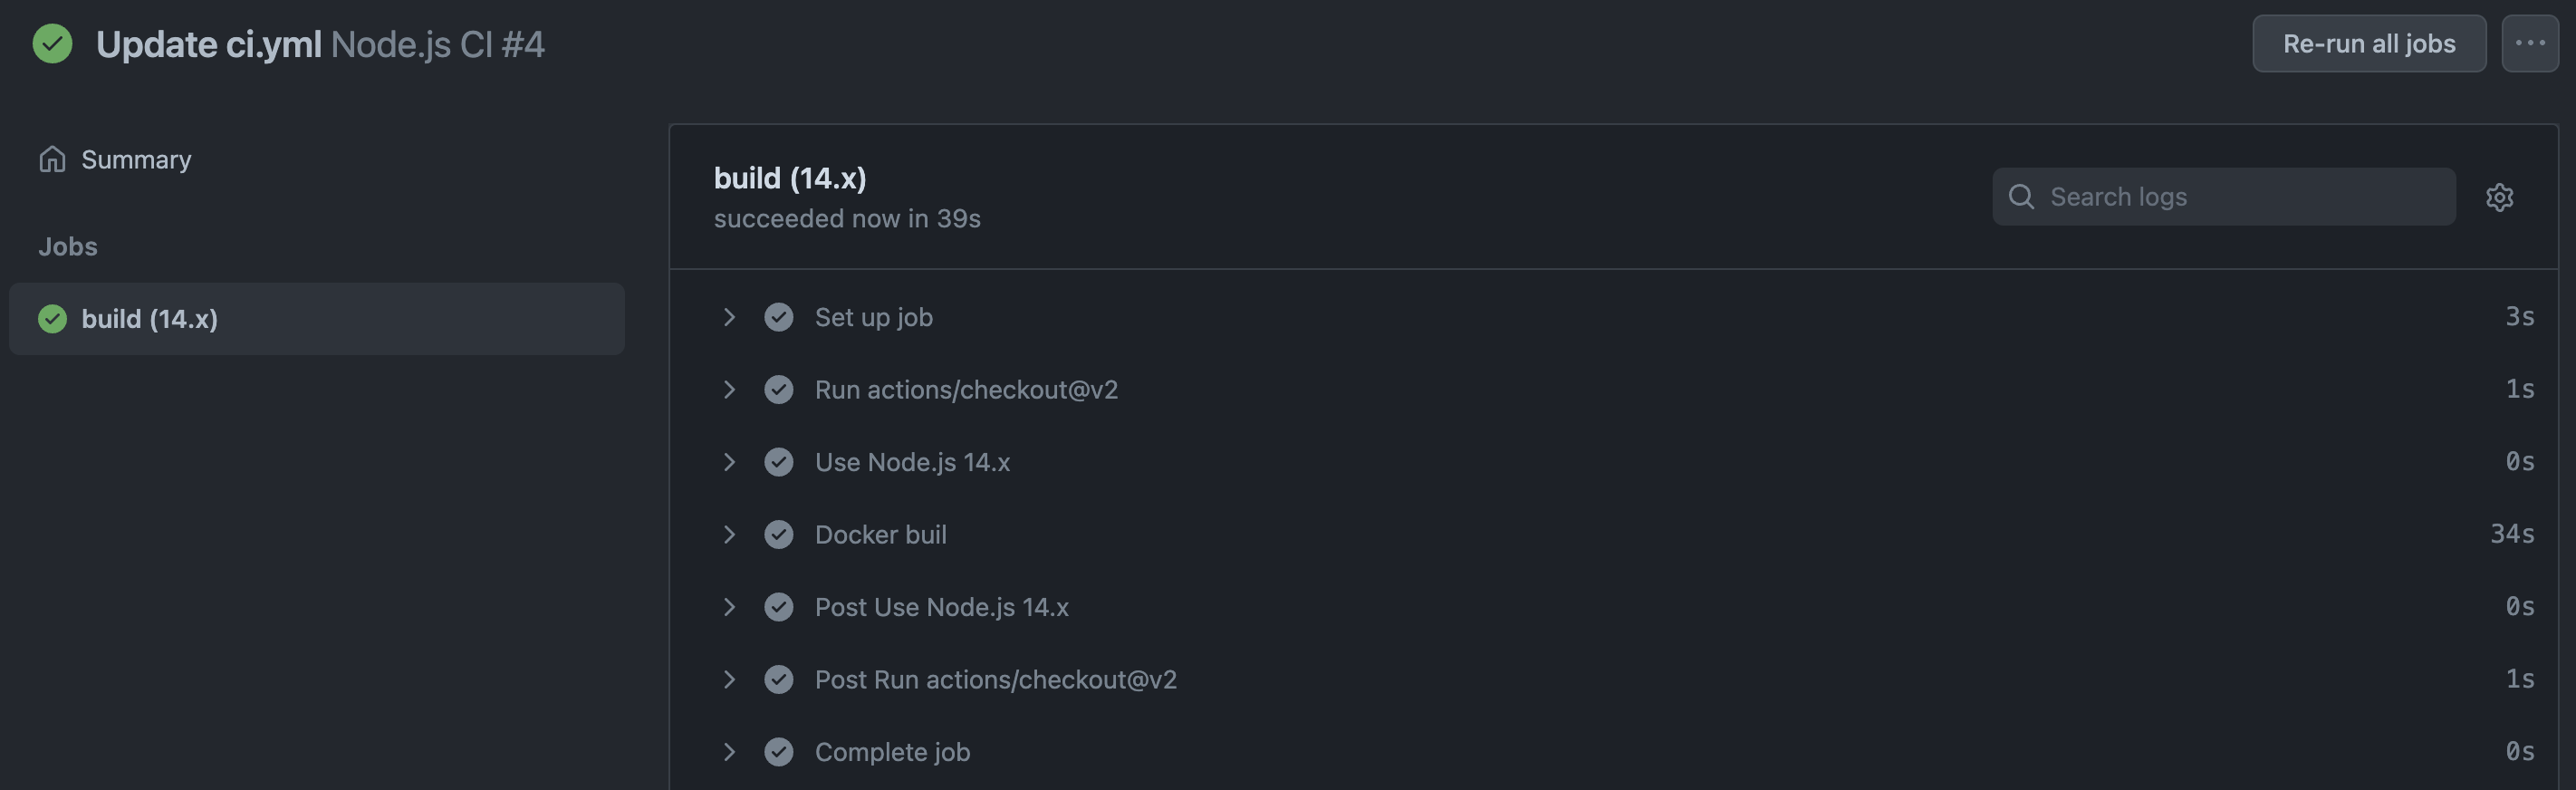
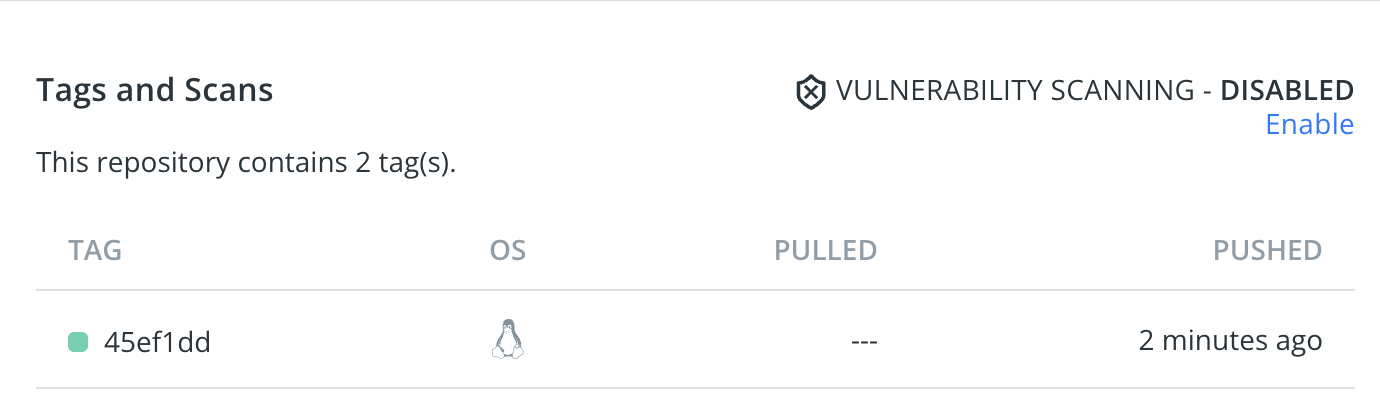
도커 허브에 푸시까지 문제없지 잘 되는 것이 확인된다. Continuous Delivery까지 끝난 셈이다.
'Env.' 카테고리의 다른 글
| CI/CD 구축하기 with Nodejs, Docker, Github Action(1) (0) | 2022.04.12 |
|---|---|
| Dockerfile 작성하기 (0) | 2022.01.25 |